1. Before you startAs a team, decide on what information you want to include as part of your batch upload. In general, the more information you can provide, the more useful the language site will be in the future, but the longer the batch may take to prepare. For example: Just the basics: word/phrase in your language, and its translation (for words/phrases) alphabet characters and their order (for alphabet characters)
Sample pronunciation audio for each word, phrase, or alphabet character A part of speech (words only) A reference or citation Additional explanatory notes
2. Review file-naming requirementsIf you are submitting media files such as audio recordings, you will need to prepare your files in a specific way so that they can be accepted by our uploader. Our batch uploader is not as flexible as the FirstVoices website, and has more restricted file name requirements. | Note |
|---|
Spaces and special characters are NOT PERMITTED in any files or folders to be uploaded. The ONLY accepted symbols are letters (a-z, A-Z), numbers (0-9), hyphen (-), underscore (_). |
Please keep this in mind and make sure that ALL files and folders you submit follow these rules. | Not accepted: | Try this: |
|---|
Basic letters and numbers only! | | Warning |
|---|
20200131-gṑdan.wav |
| Replace special letters, including letters with diacritics, with the basic Roman letters (a-z), or come up with your own conventions. |
|---|
No spaces! | | Warning |
|---|
2018 Joe Smith ahthenno.mp3 |
| | Tip |
|---|
2018_Joe-Smith_ahthenno.mp3 |
Replace any spaces with - (hyphen) or _ (underscore) |
|---|
No other special characters! | | Warning |
|---|
1.ha'a~martha&bill.wav |
| | Tip |
|---|
1_ha7a_martha-bill.wav |
Periods, apostrophes, and other symbols can be replaced with hyphens, underscores, or letters/numbers. |
|---|
| Note |
|---|
Note: MP3 files are smaller and are the preferred choice for uploading to FirstVoices and for downloading. WAV files can be used for master copies. |
3. Create your spreadsheetThe batch spreadsheet captures the metadata and documentation about your files and is required for the batch upload. You'll need a spreadsheet application to proceed with this step. | Info |
|---|
The FirstVoices team recommends Open Office because it handles the Indigenous special characters best. You can download Open Office for free at https://openoffice.apache.org/. |
Review the specific preparation instructions for the kind of batch you are working on: From the “Resources” section of the instructions page, download a template spreadsheet and save it on your computer. Open the template spreadsheet on your computer. If you are using Open Office, ensure that ONLY the box next to "Comma" is checked before clicking OK. 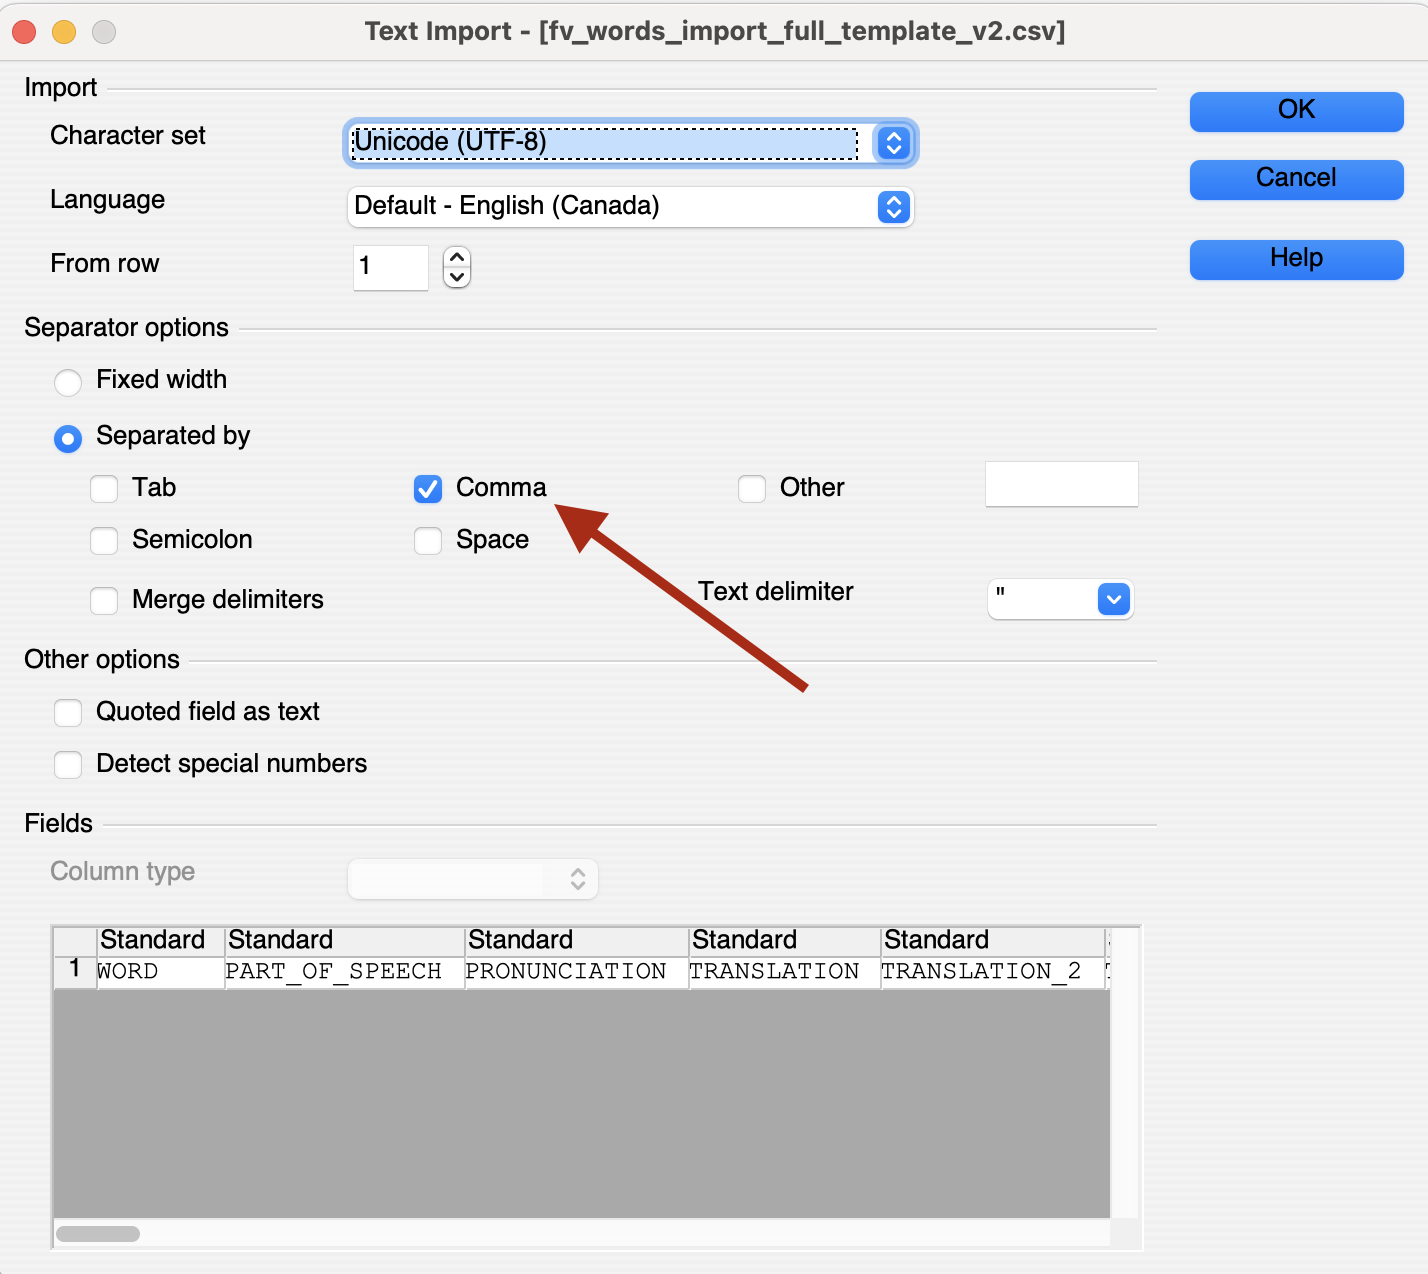 (Optional) Add or remove columns in the spreadsheet to match the field information you plan to upload. If there are optional columns in the template that you do not plan to use, you can delete or “hide” them. For example, you can delete columns relating to image files if you are not using them. You can add additional columns to the template if you wish. Please note that your additional columns WILL NOT BE UPLOADED unless the column header matches a column listed in the instructions. DO NOT change the names of the column headers in the template.
Enter your data into the appropriate columns below the headers. Take great care to avoid typos. Any errors you make in the content of this spreadsheet will be uploaded to your FirstVoices language site or may affect the success of the upload. When you are finished and ready to save, save your spreadsheet in CSV UTF-8 (Comma delimited) (.csv) file format. Give the file a practical name with no spaces or special characters, following the rules in step 2.
Example: denekeh_september_2019_words.csv Do NOT save as an Excel file (.xlsx) or a regular Comma Separated Values (.csv) – these cannot be processed and may break special characters in your data.
To include media files in the upload, copy your audio and other media files into one folder on your computer. Give the folder a practical name related to your batch. The name should follow the rules in step 2 (e.g. NO SPACES.)
Example folder: denekeh_september_2019_words_media Name your media files using the same format. The names should follow the rules in step 2. (e.g. the only special character should be the period before the file type, such as .mp3 or .wav).
Example filename: 2018_joe_smith_word1.mp3 Enter the exact filename of the media into your spreadsheet where it belongs, along with other information such as the title.
5. Double-check all your files and the spreadsheetIt's important to make sure your files, metadata and documentation are correct before you submit them. Take particular care to match the filenames in your spreadsheet exactly as they have been named in your folder. Any typos in filenames may affect that row being successfully uploaded. Work with your language team to double-check and proofread all entries before sending them in. You may wish to send it to another team member, who can open it up and make sure it saved correctly. | Note |
|---|
Once the batch upload has been submitted, any errors from typos will need to be fixed individually online by your team. |
6. Send to the FirstVoices team for processingFormat your spreadsheet and media folder as such: | Format | Example |
|---|
Spreadsheet | sitename_month_day_year_[words/phrases].csv | ktunaxa_august_2_2021_words.csv |
|---|
Media folder | sitename_month_day_year_[words/phrases]_media.zip | ktunaxa_august_2_2021_words_media.zip |
|---|
If your upload is large and cannot be attached by email, you can upload these files to FPCC’s custom Sharepoint in a folder designated for your team. To set this up or get access to the link, email hello@firstvoices.com. It is ok to zip your folder of media files for easier upload. | Info |
|---|
Locate the folder to zip. Right-click on the folder Click "Send to" and then click "Compressed (zipped) folder" Find the newly created .zip archive in the same location on your computer
|
Once the upload is complete, email batch@fpcc.ca with your files attached, or by letting us know that you uploaded them to Sharepoint. The subject of the email should match the name of your spreadsheet – so for example, if the spreadsheet you uploaded was ktunaxa_august_2_2021_phrases.csv, that should be your email subject. | Note |
|---|
Please note that it may take us longer than usual to process your batch uploads, as our FirstVoices development team capacity has been significantly reduced. If you don't hear back in the normal 1-2 week time period after sending us a batch upload, please don't be concerned — our team is working diligently to get them completed in a timely manner, and your batch will be responded to and processed as soon as possible. If you normally send multiple batches per month, we would appreciate it if you would consider sending one larger batch per month instead. This would reduce the amount of time it takes for us to process multiple batches, and speed up the process for everyone. |
7. Review uploaded contentOnce FirstVoices staff has uploaded your content, we will notify you by email. Then, you should review the new content to make sure it uploaded correctly. For words/phrases, the entries will be visible only to your language team until you approve them. Congrats, you have uploaded a batch! | Tip |
|---|
Workflow TipsAlways keep your original media files in a safe, secure place. Servers and password-protected external hard drives are always good places to keep a back-up. It's important to have a workflow that clearly identifies new entries from ones that have already been uploaded. One easy way to do this is to move files to a folder marked DONE or UPLOADED after uploading.
|
|